Sunday, December 30, 2012

Closing out 2012

Wargaming thoughts on the year ending and the year upcoming...

Like most folks, I am taking a few moments to look back on 2012 and look forward to 2013. It is fairly easy for me to summarize 2012 in a word... "fast." This year, from a wargaming perspective, sped by so quickly. I never seemed to be able to find the time to get to all of my projects. Work was busy (thankfully!) and I found the time spent with my 3 year old daughter to be more fun than painting figures. I also realize that this situation isn't likely to change so I will simply scale back my goals and projects for the coming year. I still want to collect 10,000 to 20,000 figures to cover all of the historical gaming eras that I have an interest in, it just may take a bit longer to get them all on the table!!

Playing wargames is the most important thing to me now when I consider my hobby. If you had asked me what my favorite aspect of the hobby was just a few years ago it would have been painting. Now, with my time limited a bit more than in past years, I find the wargame itself to be the most enjoyable feature in wargaming. Nothing like gathering with your friends to play a friendly game and swap a few jokes!

I wish all of you good health, prosperity, and good luck (may you always pass that critical morale test!) in 2013!


Happy New Year!!


Monday, December 17, 2012

A few photos of the Lippendorf game

I finally had the chance to retrieve some of the photos from my camera. These are shots from our most recent Napoleonic game. Most of the photos were very dim and quite worthless. The few worth seeing are shared below...
View of my Prussian foes

French left wing

French right wing

Victorious Russian cavalry pursuing defeated French lancers

French Chasseurs locked in melee with Prussian Landwehr cavalry

French left wing with Russian Dragoons in the background

French artillery and supporting infantry

Monday, December 10, 2012

Lippendorf 1813

Based on the scenario laid out in my previous post, we played out the Engagement at Lippendorf on Saturday Dec. 8th. The battle began at 10am and ended at 2:45pm. Jeff and Mike commanded the Allied force consisting of Austrians, Russians, and Prussians. The Allies had an Austrian commander who was rated Excellent. The 4 brigades of French troops were led by Eddie and I. The French commander was rated Excellent.

On the Allied side, Mike led the Austrian Infantry brigade and the Russian Dragoon Cavalry brigade while Jeff had 2 brigade of Prussians. Since I forgot to get copies of their rosters I am listing an estimated (but reasonably accurate) Allied order of battle...


Allies
Austrian Division Commander (Excellent)
No AdC
 
1st Brigade Prussians
Brigade Skirmish Bn
Line
1st Class SK

Landwehr Bn 
Conscript


Landwehr Bn 
Conscript


Landwehr Bn 
Conscript


Landwehr Bn 
Conscript


2nd Brigade Prussians
Light Infantry 
Line
1st Class SK

Reserve Infantry 
Conscript


Reserve Infantry 
Conscript


Hussars 
Elite


Landwehr Cavalry
Conscript


4 Sections 6lb Foot Artillery
Line


3rd BrigadeAustrian Infantry
Grenz
Line
1st Class SK

Infantry
Line


Infantry
Line


Infantry
Line


3 Sections 6lb Foot Artillery
Line


4th Brigade Russian Dragoons
Russian Dragoons
Line


Russian Dragoons
Elite


The French brigades were a bit smaller but of, generally, better quality. Eddie had Gonalons' Infantry brigade and Gorgelin's Cavalry brigade. I commanded Grenier's Infantry brigade and Lloris' Chasseur a Cheval Cavalry brigade. Here is our order of battle...


General de Division Vercoutre (Excellent)
1 AdC (Average)
 
1st Brigade GdB Gonalons (Average)
1st Bn  21st Legere 
Veteran
1st Class SK

1st Bn 61st Ligne 
Veteran


2nd Bn 61st Ligne 
Veteran


1st Bn 67th  Ligne 
Veteran


2nd Bn 67th  Ligne 
Veteran


2nd Brigade GdB Grenier (Average)
2nd Bn  21st Legere 
Veteran
1st Class SK

2nd Bn  23rd Legere 
Veteran
1st Class SK

1st Bn 51st Ligne 
Veteran


2nd Bn 51st Ligne 
Veteran


4 Sections 6lb Foot Artillery
Veteran


3rd Brigade GdB Gorgelin (Average)
Lancers
Veteran


4th Brigade GdB Lloris (Average)
7th Chasseurs a Cheval
Veteran


14th Chasseurs a Cheval
Elite


Initial positions and directions of movement

The action opened with a general advance by the Allies while the French troops of Gorgelin, Gonalons, and Grenier dashed forward while the cavalry of Lloris held back. It soon became obvious that Gorgelin's outnumbered Lancers would be forced to engage in a melee with the Russian Dragoons in order to protect the advancing infantry of Gonalons. About the time that Gonalons reached the hill to his front the Russian Cavalry announced a charge. With no real choice, Gorgelin's Cavalry counter-charged. This gave the left flank battalions of Gonalons time to make squares as they cheered on the brave Lancers. The two cavalry brigades crashed together and the weight of numbers quickly told. The Lancers lost the melee, and half of the men in the unit, and retreated towards the rear with the victorious Russians in close pursuit. As Gonalons' troops deployed onto the hill to engage the advancing Austrian Infantry, they could only watch in horror as the Russian Cavalry caught and destroyed the remaining French Lancers. 

Meanwhile, the Prussian 1st and 2nd Brigades advanced toward farm and the hill. The farm fell into their hands without a fight as they were no French troops available to dispute the advance of the Landwehr. The presence of Lloris' Chasseurs kept the Landwehr rooted in the area of the farm. Grenier's Frenchmen rapidly gained possession of much of the hillock that the Prussian 2nd Brigade was moving towards so the Prussians halted and prepared an attack. What followed was several turns of fire between the skirmish lines. 

Grenier's artillery was forced to re-orient its facing toward the left wing to deal with the Russian Dragoons now lurking to the French left-rear. The skirmishers of Gonalons and Grenier began to inflict harsh casualties on the Allied units while Gonalons' squares kept the lurking Russian Cavalry from exploiting their fortunate position. Soon, under heavy artillery fire and with no place to charge, the Russian Cavalry moved back to its starting point on the Allied right wing. 

Now things really heated up. The French troops of Gonalons and Grenier were able to fully deploy and began to decimate the Austrian Infantry and the Prussian 2nd Brigade's infantry. Mike's unlucky dice saw the much-suffering Austrians began to fail morale and fall back. Grenier's troops were doing well against both Prussian Brigades and it seemed like time to add Lloris' Cavalry into the mix. Lloris led his Chasseurs in a charge against the Prussian Landwehr Cavalry that sat in the area between the 1st and 2nd Prussian Brigades. It looked like an easy victory. It was not. The Chasseurs became locked in melee with the smaller Prussian cavalry unit. Eventually the French numbers and superior morale won out and threw the Prussian horsemen back. Unfortunately for the Chasseurs, the prolonged melee had allowed the Prussian Hussars to move into position and they struck Lloris' men on the very next turn. The Chasseurs lost the melee and retreated away from the Prussian Hussars. 

Soon after those events the battle was over. The Austrian Infantry had been driven back but Gonalons could not finish them off as the Russian Dragoons hovered menacingly on the wings. The Prussian 2nd Brigade's infantry was decimated and had been pushed off of the hill in front of Grenier. The Prussian 1st Brigade firmly held the farm and the Russian Cavalry had undisputed control of the Lippendorf area.

The French had lost a regiment of Lancers, the Chasseurs had suffered @30% losses, and the infantry brigades had lost @10 to 15% casualties. Surprisingly, no French generals were killed even though they constantly led from the front. The Allies lost @ 50% of the Austrian Infantry, lost @40% of the Prussian 2nd Brigades infantry, and suffered little in the other units. Two Allied officers were wounded but soon returned during the battle.

When I get time I will attempt to upload a few photos.

Friday, December 07, 2012

Next Scenario

Our next game will be another a-historical affair. Instead of reproducing an actual battle we are resorting to the "lazy way out" and doing our first points battle. General de Brigade has a table of point values for units and officers to help design a game. I suppose that this idea of point values is a carryover from Games Workshop style games where "points battles" seem to be the norm. Our primary goal was to add the element of surprise since the opposing sides will not have much prior knowledge of the opposing force.

Here is the scenario information that the players will get before the battle:


Encounter near Lippendorf
This fictional meeting engagement is set around the time of the Battle of Leipzig in 1813. Our scenario supposes that the French and Allied forces have detached units to seize the area east of Lippendorf to protect their southern flanks. The objective of each side is to secure the hills on each side of the Leipzig Road, the hamlet of Lippendorf, and the Kaltz Farm.
Each side has been allotted @1200 points  to “purchase” units and officers based on the point values noted in the General de Brigade Deluxe edition. The only stipulation is that each side must buy a minimum of 1 infantry unit (of 20+ figures), 1 cavalry unit (of 12+ figures), and 1 artillery battery (of at least 2 sections). Beyond that, any combination of troop types and quality is allowed. The troop rosters will remain hidden until the day of battle. This is our attempt at a bit of “fog of war”.

Objectives:
The side holding the most objectives wins. “Owning and objective” goes to the side that, most recently, has/had a unit move across that point while in GOOD ORDER. Sorry guys, retreating units passing over an objective point will not hold it for your side!

Terrain Notes:
The Hamlet of Lippendorf and Kaltz Farm will hold 1 battalion of 24 figures and counts as COVER -2

The Hills are GOOD TERRAIN and only serve to block line of sight

The Woods are DIFFICULT TERRAIN with a 6 inch visibility limit

The Roads offer x2 speed for units in MARCH COLUMN that spend the entire move on the roads
Scenario Map

Monday, November 19, 2012

Another Rough Outing


Rolica 1808
25mm Napoleonic
General de Brigade

Our most recent game was a Napoleonic battle staged at the club rooms on Saturday  the 17th. Jeff had modified a scenario from one of the General de Brigade scenario books that featured a "delaying action" by the French against a larger Anglo-Portuguese force. Overall, the French had 2 Infantry Brigades (of 4 Bns each), a Cavalry Brigade (1 Hussar Regiment), and an artillery battery of 6 guns. The Allies had 4 Infantry Brigades (varying in strength at 3Bns or 4Bns) and a pair of artillery batteries. I led the right wing of the French line while Carl controlled the Left Wing, the artillery at our center, and our cavalry unit.

The French (half of the "French" troops were foreign "Legions") set up on a ridge line to await the Allied advance. The Allies quickly advanced in hopes of bringing superior numbers to bear. As always seems to be the case in such matters, they had more troops than room to deploy them. So, for a short time, the French enjoyed success as the French skirmish line caused much difficulty as Allied units tried to change from columns to lines to begin their assaults. The French advantage soon faded...

A quick aside... Once again, my dice rolling was far, far, far (did I mention FAR?) below average. I scored a lucky shot early on that killed the British General leading the British Left Wing. That was to prove to be my one moment of positive results. Throughout the rest of the engagement my troops never fired a shot higher than 5 on 2D6 and I was only able to pass @1/3 of all of my morale tests.

After a lengthy exchange of musketry all along our lines the British were finally in a position to launch a series of assaults on our wings while the Portuguese held the Allied center. The British units assaulting our left wing fared poorly in their melee rolls while my compatriot Carl was rolling well. On my wing (French right) the British assaults were blunted by poor rolls from the British commander. This led him to switch tactics and he simply engaged my line in a musket duel. My poor rolls quickly doomed my units to losing the firefight as superior numbers played the advantage of the British. My Brigade also began to take fire from the Portuguese units from the Allied center.

At game's end things were looking grim for the French side. We had lost half of our infantry units as casualties and Allies were atop the ridge line that we had been defending. However, this was a delaying action and we had held the British/Portuguese advance for just long enough that the battle was declared, to our surprise, as a minor victory for the French!

As always, our General de Brigade games are good fun and we all enjoy the battles. We have crossed into that rare (for our group) situation where almost everyone playing knows the rules well enough that there is very little need for flipping through the rule book to figure out how to do something. This leaves more time to discuss sports, our families, and all of the topics that fly around our game table... ;)


I am including a few cell phone photos for you to see but they are not very good pictures...

View of French center and left wing early in the battle
View of French center and right wing as skirmish lines meet

View from behind the right wing of the French lines


French left wing's final positions
French right wing taking fire from multiple British units - the end is near!


The remaining French Bn (still in good order) from the right wing

Monday, November 05, 2012

A Study in BAD Luck!

We gathered to play out the cavalry battle scenario on Saturday November 3rd. I will spare you the suspense of wondering what happened... it was an Allied Victory. My poor tactics and HORRID dice rolls caused my French units to lose almost every melee that they were engaged in. I look forward to trying the scenario again as I think that it would be difficult for me to play as badly again!

I have included some pictures but they are not very good as I had trouble getting the camera to focus! If nothing else, you get a general idea of the size of the battle.

French heavy cavalry


French cavalry approaching from the right

French cavalry approaching from the right


French Cuirassiers charging Russian Dragoons


All smiles during set up

Jeff (Prussian Cavalry Commander) surveys the village

View of the village from the passing Cuirassier Brigade

French Cuirassiers and Dragoons about to launch ill-fated charges

French Guard cavalry surveying the area where the French Cuirassiers used to be

French Dragoons ROUTING

French Guard Cavalry about to hit Russian Dragoons

Infantry stalemate in the middle


Monday, October 29, 2012

Cavalry Clash

It has been some time since I have shared any news of my wargaming activities. In a return to my club's favorite period for wargaming, I have devised a scenario for a Napoleonic game for our next meeting. We had been discussing playing a large cavalry action, so... here is my scenario for a large (to us at least) cavalry battle set during the 1813 campaign. Like many of my scenarios, it will likely end in ruin for my French troops and leave me pondering the "two or three things that I forgot to include in the scenario design..."

If anyone reading this scenario ever tries to play it I would like to hear your results!

The scenario is created for 28mm troops using General de Brigade Deluxe rules.


Mounted Clash at Oelzschau
The Great Cavalry Battle

This fictional scenario is, mainly, a good excuse to put the majority of our cavalry units on the table.  It is set in 1813 as a further excuse to have such a mix of nationalities as our collections provide. However, in the interest of scenario balance, the qualities of individual units may not accurately represent their strengths or abilities in 1813. Similar types of units have been brigaded together for simplicity. Never heard of any of the officers on the unit rosters? They are players from the 1982 World Cup…

It is October of 1813. Napoleon’s hastily re-constructed Grande Armee is facing a large, determined, Coalition Army in Germany. As the two vast armies maneuver for advantage there is an encounter between cavalry screens that quickly grows as each side draws upon nearby reinforcements in a bid to destroy valuable enemy cavalry units. Ruining some of the enemy horse formations would give the winning side an advantage in scouting/screening while restricting the enemy’s freedom to maneuver.

The small village of Oelzschau is situated south-west of Leipzig and quickly becomes the focus of the cavalry forces of Platini and Blokhin. Control of the village will go far in controlling the south-western approach to the great city of Leipzig. For this reason, the two sides quickly begin feeding in reinforcements in a bid to quickly seize the village.

When the battle opens it is @ 9:30am and heavy cavalry units have already moved into the area to bolster the strength of the light cavalry that has been sparring with their opposites since nightfall of the previous day. Each side has managed to gather a few infantry units to add to the attacks on Oelzschau. The fear of the foot soldiers is that they will simply be “meat for the grinder” as large numbers of cavalry units move all around them.


Terrain Notes:
The Village of Oelzschau will hold 1 battalion of 24 figures and counts as COVER -2

The Hills are GOOD TERRAIN and do not have any effect on movement. Line of sight is blocked by hills.

The Woods are DIFFICULT TERRAIN

The Roads offer x2 speed for units in MARCH COLUMN that spend the entire move on the roads

Objective Notes:
We will add up points to determine a victor (or loser, if you are me)
1. The cross-roads hamlet of Oelzschau is the key terrain objective and is worth 10 points
2. Each side is seeking to destroy or rout more than one enemy brigade. Each destroyed brigade is worth 5 points
3. Each enemy general killed or colors taken is worth 5 points
4. Each enemy battalion/cavalry regiment destroyed or dispersed is worth 3 points
5. Enemy artillery destroyed is worth nothing


Imperial Forces
GdD Michel Platini
1 AdC                                        1322
Guard Brigade
GdB Ettori
Polish Lancers of the Imperial Guard
12
Guard

96
Horse Grenadiers of the Imperial Guard
12
Guard

108

Heavy Brigade
GdB Baratelli
3rd Cuirassiers
12
Veteran

90
11th Cuirassiers
12
Veteran

90

Heavy Brigade
GdB Casteneda
7th Dragoons
12
Veteran

78
8th Dragoons
12
Veteran

78

Light Brigade
GdB Genghini
6th Hussars
12
Line

48
7th Chasseurs
12
Line

48
8th Chasseurs
16
Line

64
Horse Artillery 6lb
2
Veteran

76

Polish Brigade
GdB Battiston
3rd Polish Chasseur
12
Line

48
5th Polish Hussars
12
Line

48

Saxon Brigade
GdB Giresse
Saxon Hussars
12
Line

48
Saxon Kuirassier
12
Veteran

90


Infantry Brigade
GdB Bossis
111th Line
24
Line

48
111th Line
24
Line

48
Foot Artillery 6lb
2
Line

60

Infantry Brigade
GdB Lacombe
114th Line
24
Line

48
114th Line
24
Line

48
Foot Artillery 6lb
2
Line

60


Allied Coalition Forces
General Blokhin (RUS)
1 AdC                                            1360
Russian “Guard” Brigade
General Dasayev (RUS)
Guard Cossack
16
Elite

96
Uhlans
12
Veteran

66

Russian Heavy Brigade
General Gavrilov (RUS)
Dragoon
12
Line

72
Dragoon
12
Line

72
Dragoon
12
Line

72

Allied Heavy Brigade
General Buryak (RUS)
Russian Kuirassier
12
Veteran

90
Austrian Kuirassier
12
Veteran

90

Austrian Light Brigade
General Prohaska (AUS)
Hussars
16
Line

64
Uhlans
12
Line

60
Horse Artillery 6lb
2
Line

70

Prussian Dragoon Brigade
General Ilgner (PRU)
2nd West Prussian Dragoons
12
Line

72
3rd Lithuanian Dragoons
12
Line

72

Prussian Light Brigade
General Kahn (PRU)
2nd Life Hussars
12
Line

48
Russo-German Hussars
12
Line

48
Silesian Landwehr Cavalry
16
2nd Line

56

Infantry Brigade
General Littbarski (PRU)
Prussian Line
24
Line

48
Prussian Line
24
Line

48
Foot Artillery 6lb
2
Line

60

Infantry Brigade
General Bierhoff (PRU)
Prussian Line
24
Line

48
Prussian Line
24
Line

48
Foot Artillery 6lb
2
Line

60


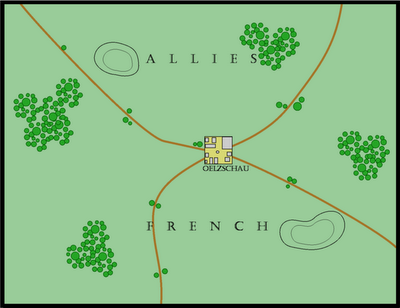
A map of the scenario

Pictures